Documentation
Everything GOGUL can do — how each tool works, what it costs, and which plan unlocks it. Prices and limits on this page are read directly from the product configuration.
Welcome to GOGUL
GOGUL is an AI platform for images, video and storyboards. You describe the shot, GOGUL orchestrates the right model — and keeps your characters consistent from frame to frame.
Every generation is paid in credits. You start with 100 credits on the Free plan, and the exact price of any action is always shown before you confirm it.
Quick start guide
Four moves from a blank page to a finished clip:
Generate an image
Open Image in the sidebar, type a prompt, pick a model and press Generate. Free-plan models start at 10 credits per image.
Save a character
On any image card choose Save as Character, or upload a photo on the Characters page. Generate Character Views so the AI sees your character from several angles.
Build a storyboard from a script
Paste a script on the Script page — analysis is free. Review the scene breakdown, attach your characters, then generate frames at 10 credits each on GOGUL 1.0 or 40 on GOGUL 3.0 with Character Lock.
Animate a frame
Open Video → Image to Video, pick a frame from your library and describe the motion. The Generate button shows the exact credit price before you commit.
Gogi assistant
Gogi is the built-in help assistant. It answers questions about GOGUL from this documentation and takes your account into account: your plan, your credit balance and the page you are on.
- Where to find it: The round button at the bottom right of every dashboard page. On phones it is hidden on the Image page, where it would cover the prompt bar.
- Daily limit: 20 questions per day per account. The window is rolling, not calendar-based: when the limit is reached, the panel shows how long until the next question.
- What it does not do: Refunds, payments, chargebacks and account blocks — Gogi does not resolve them. These go to the support team.
- If the answer did not help: Press “Write to support” right in the panel. The message goes to the support team, and the reply comes by email.
Image generation
The Image page (sidebar → Create → Image) turns a text prompt into pictures. Pick a model, a quality tier, an aspect ratio and a style; optionally attach reference images. The counter next to the Generate button sets how many images to make, and the button shows the total price before you press it.
Models and quality tiers locked below your plan unlock after any credit-pack purchase. Quantity limits (frames, characters) stay plan-based.
Image models
Every model, its price per image at 1K, the plan that unlocks it, and whether it accepts reference images.
| Model | Credits | Plan | Reference images | 2K / 4K |
|---|---|---|---|---|
| FLUX.2 [pro]Exceptional photorealism & artistic images | 10 | All plans | — | |
| Seedream 5.0NewLatest generation & consistency | 10 | All plans | up to 10 | |
| Seedream 4.5BudgetGreat value — unified generation & editing | 10 | All plans | up to 10 | |
| Krea V2 MediumBudgetKrea · Fast & affordable | 10 | All plans | — | |
| Nano Banana LiteFastFast & cheap — Google Gemini 3.1 Flash Lite | 10 | All plans | up to 5 | |
| FIBO 1.5NEWPrecise & predictable — strong photorealism, textures & in-image text | 12 | All plans | — | |
| Seedream 5.0 ProNewFlagship detail & realism | 15 | Starter and up | up to 10 | |
| Krea V2 LargeNewKrea · Best quality & composition | 20 | Starter and up | — | |
| GPT Image 1.5Best for textPerfect text rendering & instruction following | 10 | Starter and up | up to 4 | |
| Nano Banana 2RecommendedKeeps identity from reference — Google Gemini | 20 | Starter and up | up to 14 | |
| GPT Image 2NewBest text rendering & photorealism — OpenAI | 20 on Starter · 30 on Pro · 30 on Studio · 20 on Agency | Starter and up | up to 4 | |
| Nano Banana ProPremiumBest photorealism — Google Gemini 3 Pro | 40 | Pro and up | up to 14 |
Quality tiers
Higher output resolution adds a surcharge on top of the model price and requires a plan. Only models marked in the 2K / 4K column actually deliver larger pixels — the tier is hidden for the others.
| Quality | Extra credits | Plan |
|---|---|---|
| 1K | — | All plans |
| 2K | +10 | Starter and up |
| 4K | +20 | Pro and up |
Seedream 5.0 Pro is priced per quality tier instead of base + surcharge: 1K — 15, 2K — 30. Each reference image beyond the first adds one credit.
Styles
A style appends a proven prompt suffix so you don't have to write lighting and lens language yourself. The Free plan can use 3 styles (None, Cinematic, Photorealistic); the other 7 show a lock and open the upgrade dialog. This gate is plan-only — a credit pack does not unlock styles.
Image editor
The Edit page (sidebar → Tools → Edit) modifies an existing image instead of creating a new one. Upload a file or pick anything from your library; the tool rail appears once an image is loaded. Every tool works on the current result, so edits can be chained.
Text edits run on Seedream 5.0 Pro — 10 credits at 1K, 20 at 2K.
Tools
| Tool | What it does | Credits |
|---|---|---|
| Edit by text | Describe the change in the prompt bar — the model modifies only what you ask and keeps the composition. Model and quality are chosen in the same bar. | 10 |
| Quick presets | Chips that fill the prompt with a ready instruction. They do not run by themselves — press Generate, and the edit is billed as a normal text edit. | 10 |
| Brush (inpaint) | Paint a mask over the area and describe what should be there; brush size, undo and clear are in the panel. | 15 |
| Select area | Drag a rectangle and choose whether to edit only that area or keep it untouched; the selection is added to your prompt. Available on Seedream 5.0 Pro only. | 10 |
| Remove background | One click — cuts the subject out on a transparent background. | 5 |
| Outpaint | Expand the canvas to a new aspect ratio; the model fills in the missing edges. | 12 |
| Upscale | Enlarge to 2K or 4K — same prices as the Upscale section. | 10 / 15 |
| Relight | Pick a light direction and one of the light presets (golden hour, blue hour, studio, dramatic, neon, soft daylight) to relight the scene. | 12 |
| Enhance | One click — sharpens and adds detail while keeping the content identical. Always runs on Seedream 5.0 Pro at 1K, whatever model is selected. | 10 |
| Move (pan & zoom) | Zoom into the image and drag to pan while you inspect it. It does not move objects and costs nothing. | Free |
Outpaint works on images that are already in your gallery. For a fresh upload, run any other edit first (the result is saved) and then outpaint it.
Upscale
Upscale sharpens and enlarges any generated image or storyboard frame. Available from the image card, the editor and the storyboard editor.
- 2K — 10 credits
- 4K — 15 credits
The upscaled version is added to your gallery next to the original.
Modes
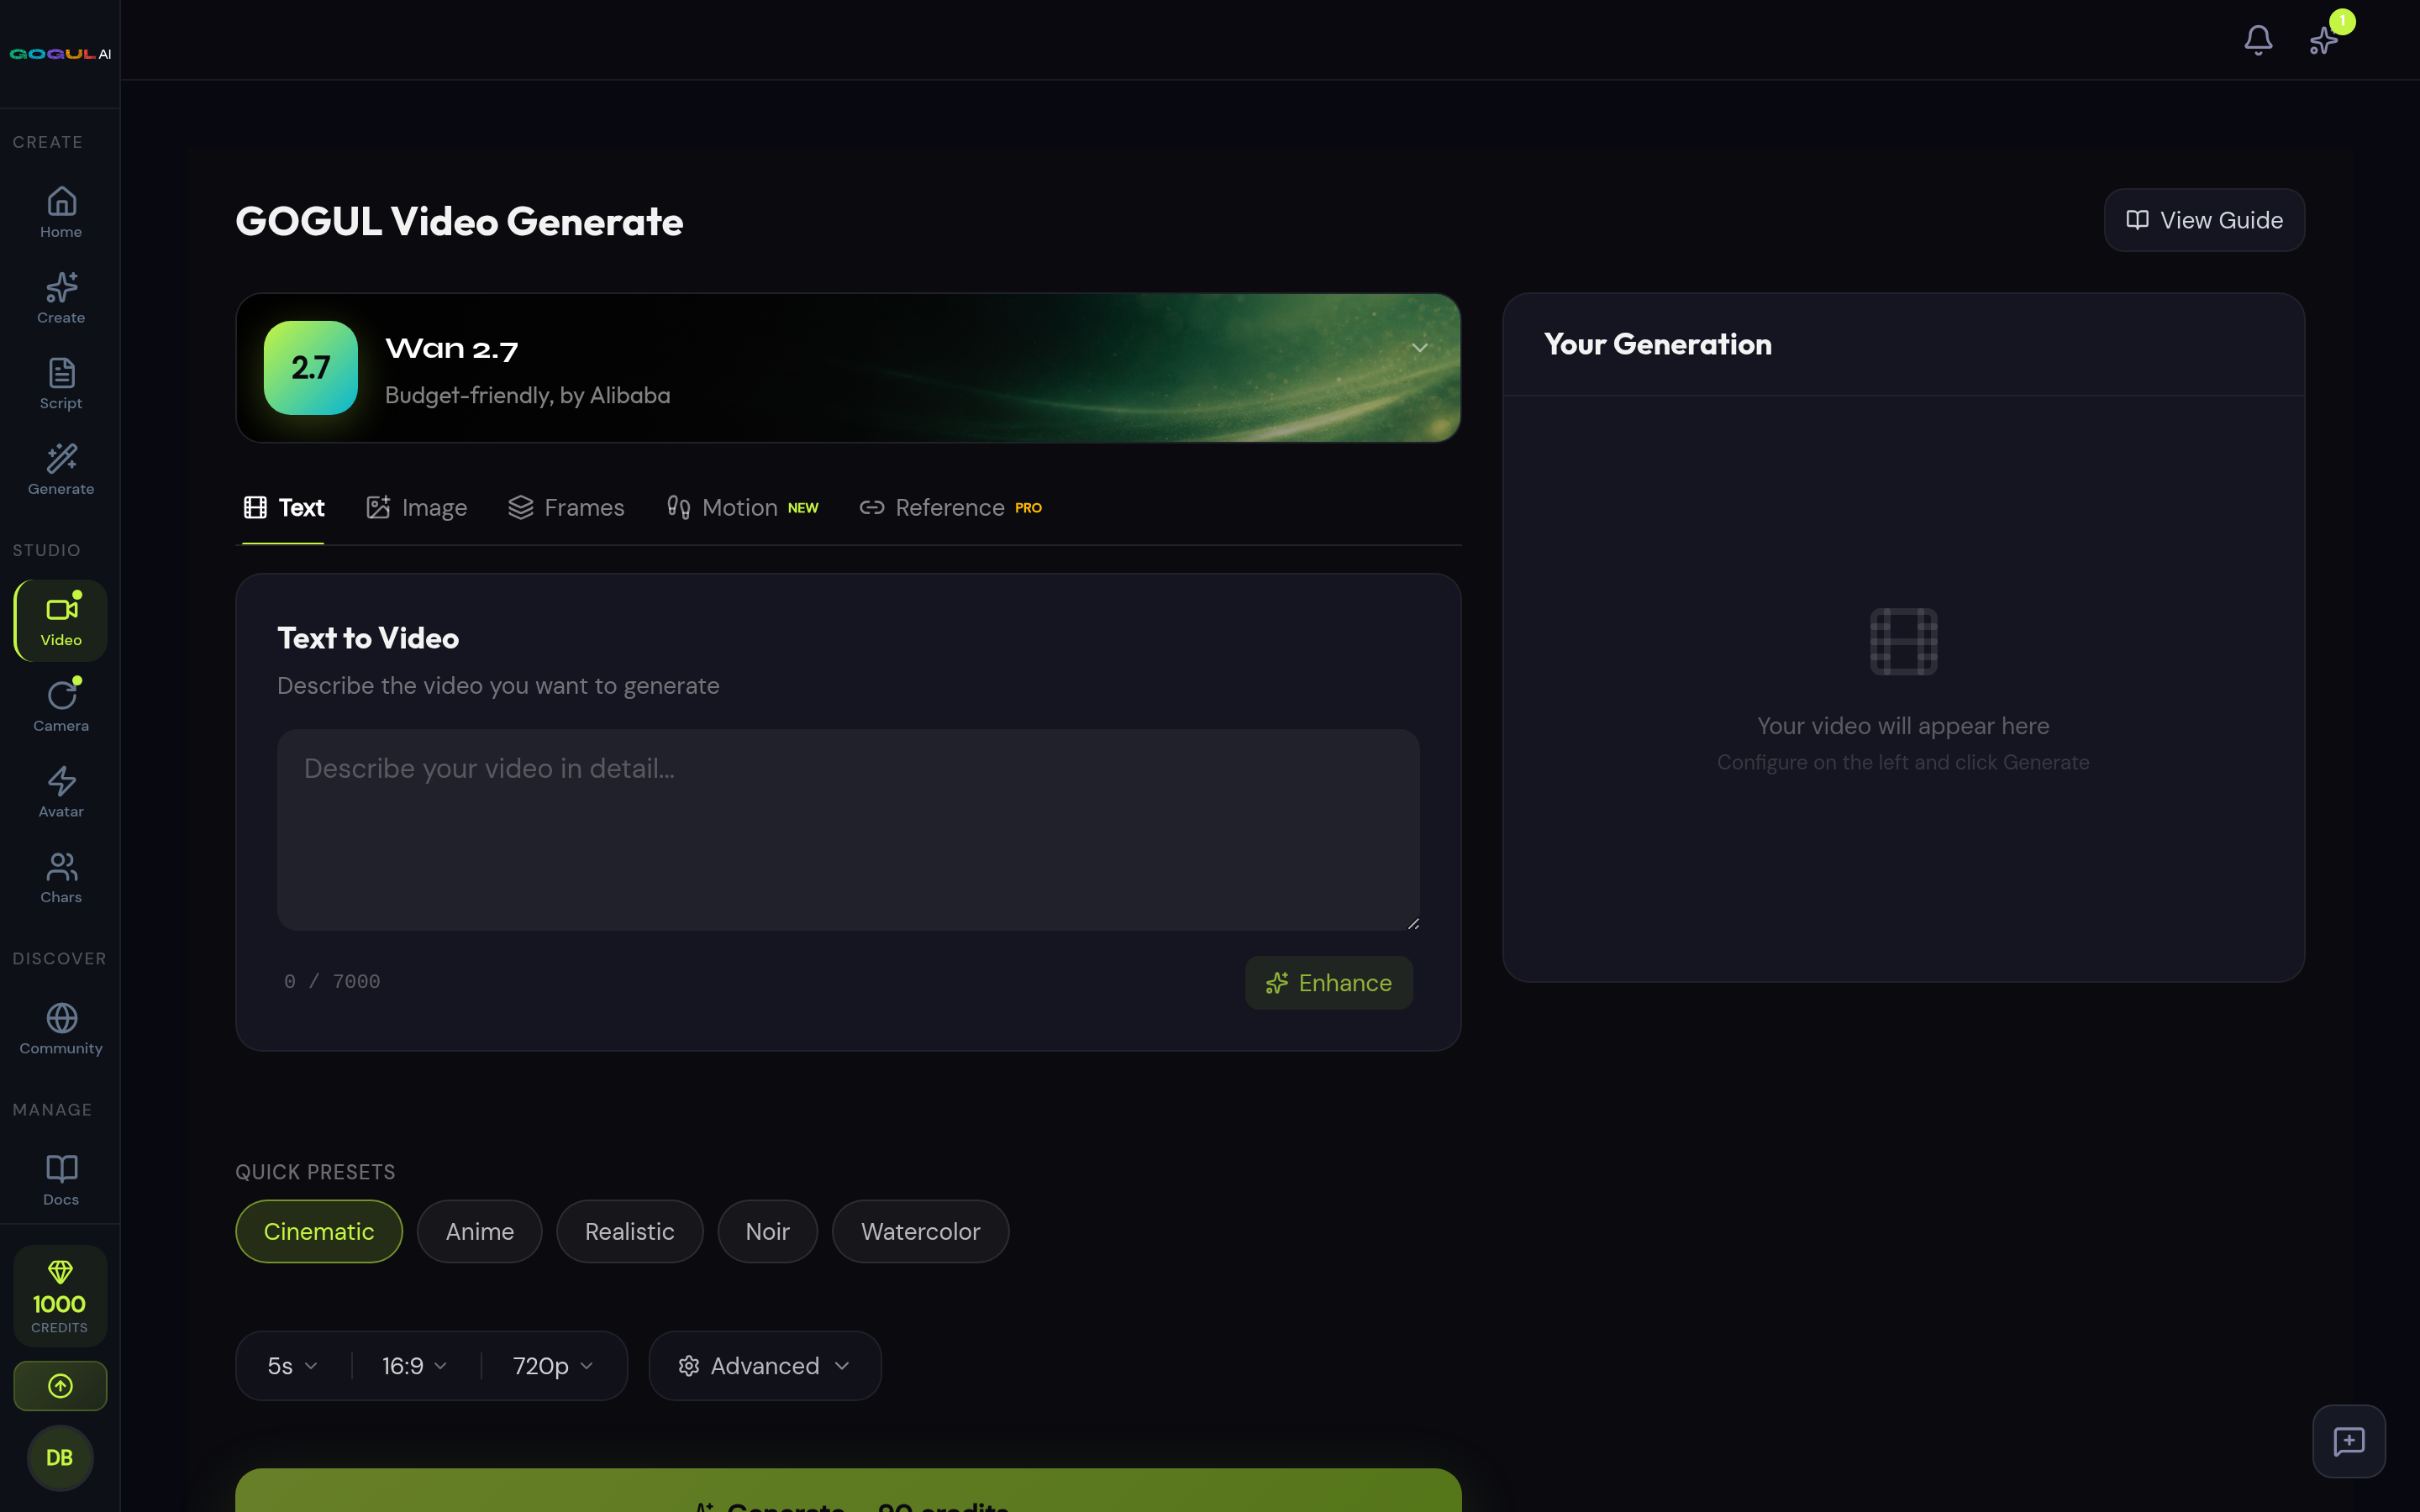
The Video page generates short cinematic clips from a text prompt, a single image, a pair of start/end frames, or a set of reference images. This guide covers every mode, every model, and exactly how pricing works — so you always know what a clip will cost before you press Generate.
Quick Start
From idea to finished clip in five steps:
Open the Video page
Go to Video in the sidebar. Your last unfinished setup is restored automatically — drafts are autosaved.
Pick a mode tab
Choose Text to Video, Image to Video, First & Last Frame, or Reference, depending on what you're starting from.
Write your prompt
Describe the shot — up to 7,000 characters. Focus on motion: what the camera does and what happens in the frame.
Choose model, duration, and resolution
The exact credit price updates live on the Generate button as you change settings — no surprises.
Hit Generate
Credits are charged when generation starts. Clips on Wan 2.7, Kling 3.0, Veo 3.1 Fast are usually ready within a few minutes; Seedance 1.5 Pro, Seedance 2.0 Pro, Seedance 2.0 Fast, Seedance 2.0 Mini run through a queue and can take up to 15 minutes.
The Four Modes
Each tab on the Video page is a different way of telling the model what to make. Pick the one that matches your starting material.
Models
Each model has its own plan requirement, supported inputs and price per second. Use this table to pick before you prompt.
| Model | Plan | With audio · cr/sec at 720p | Audio off | Inputs | Unlock |
|---|---|---|---|---|---|
| Seedance 1.5 Pro | All plans | 30 | 16 | Text, Image | All plans |
| Wan 2.7 | Starter and up | 18 | — | Text, Image, First & last frame | Unlocks with any credit pack |
| Seedance 2.0 Pro | Starter and up | 19 | — | Text, Image, Reference | Unlocks with any credit pack |
| Seedance 2.0 Fast | Starter and up | 15 | — | Text, Image, Reference | Unlocks with any credit pack |
| Seedance 2.0 Mini | Starter and up | 10 | — | Text, Image, Reference | Unlocks with any credit pack |
| Kling 3.0 | Pro and up | 30 | 24 | Text, Image, First & last frame | Unlocks with any credit pack |
| Veo 3.1 Fast | Studio and up | 38 | 31 | Text, Image, First & last frame | Plan-exclusive — no credit-pack bypass |
The audio toggle changes the price on Seedance 1.5 Pro, Kling 3.0, Veo 3.1 Fast: audio off is cheaper. The other models charge the same either way.
Seedance 2.0 tiers
Seedance 2.0 runs as three tiers that share one pipeline and accept text, image and reference inputs. They differ in price per second, top resolution and speed:
| Tier | cr/sec at 720p | Resolutions | Durations, s | Plan |
|---|---|---|---|---|
| Seedance 2.0 ProProTop-tier quality up to 1080p, by ByteDance | 19 | 480p / 720p / 1080p | 4, 5, 6, 8, 10, 12, 15 | Starter and up |
| Seedance 2.0 FastFastQuick turnaround generation, by ByteDance | 15 | 480p / 720p | 4, 5, 6, 8, 10, 12, 15 | Starter and up |
| Seedance 2.0 MiniNewFast, budget-friendly generation, by ByteDance | 10 | 480p / 720p | 4, 5, 6, 8, 10, 12, 15 | Starter and up |
- 1080p is offered on Seedance 2.0 Pro only; the other tiers stop at 720p and a stale 1080p choice snaps back to 720p when you switch to them.
- All three unlock on Starter — or with any credit pack purchase on lower plans.
- The Generate Audio toggle does not change the price of these tiers.
Pricing
Every video price comes from one formula: credits = base rate per second × seconds × resolution multiplier. Resolution multipliers are ×0.5 for 480p, ×1 for 720p, and ×2.25 for 1080p. “Auto” duration is billed as 5 seconds.
Resolution multipliers
- 480p — ×0.5
- 720p — ×1
- 1080p — ×2.25
- “Auto” duration is billed as 5 seconds.
Base rates (credits per second at 720p)
- Seedance 1.5 Pro — 30 (16 audio off)
- Wan 2.7 — 18
- Seedance 2.0 Pro — 19
- Seedance 2.0 Fast — 15
- Seedance 2.0 Mini — 10
- Kling 3.0 — 30 (24 audio off)
- Veo 3.1 Fast — 38 (31 audio off)
What typical clips cost
| Setup | Credits |
|---|---|
| Seedance 1.5 Pro — 5s, 720p, audio on | 150 |
| Wan 2.7 — 5s, 720p | 90 |
| Seedance 2.0 Pro — 5s, 720p | 95 |
| Seedance 2.0 Fast — 5s, 720p | 75 |
| Seedance 2.0 Mini — 5s, 720p | 50 |
| Kling 3.0 — 5s, 720p, audio on | 150 |
| Veo 3.1 Fast — 5s, 1080p, audio on | 428 |
Advanced options
Below the prompt you'll find extra controls. They're useful shortcuts, but it helps to know what they actually do.
Reference mode
Reference (a tab on the Video page) composes a new scene from up to 9 reference images while keeping the subject, location or style they show. Attach images from a file, your library, a saved character, a location or a style, then point at them in the prompt.
Tags are positional: @Image1 is the first chip, @Image2 the second, and so on. Type @ in the prompt to pick a reference from a menu; focusing an empty prompt with references attached pre-fills the tags for you.
- Runs on Seedance 2.0 Pro, Seedance 2.0 Fast, Seedance 2.0 Mini. If another model is selected when you open the tab, the page silently switches to Seedance 2.0 Mini (the cheapest); leaving the tab keeps that model.
- One reference audio track (MP3 or WAV, up to 15 MB, short) can be attached. Reference videos are not accepted by the current models.
- Priced like any clip of the same model, duration and resolution — references add nothing.
First & Last Frame
First & Last Frame animates from a start image to an end image; the prompt describes the transition. Both frames are required — JPG, PNG or WEBP up to 20 MB each, uploaded or picked from your library.
Supported by Wan 2.7, Kling 3.0, Veo 3.1 Fast. If another model is selected when you open the tab, the page switches to Wan 2.7 and shows a toast; the model list on this tab only shows supporting models.
Same formula as Text to Video and Image to Video.
Preset catalog
The preset catalog (sidebar → Inspiration → Presets, or the Presets pill on the Video page) is a set of ready recipes maintained by the GOGUL team: a prompt template, generation settings and input slots. Fill the slots, pick a model and aspect ratio where the recipe allows it, and press Generate.
- A slot takes an image, a video, an audio track, a line of text or a pick from a gallery of preset images. Each accepts an upload or an item From Library; required slots must be filled before Generate is enabled.
- The card shows the price computed from the recipe's default model and duration; the Generate button recomputes it for the model you chose. Same video formula — presets carry no surcharge.
- Filter by model, category or title. Categories and the recipes themselves are set by the team; if a recipe changes while you have it open, the page asks you to reload it.
Limits & waiting
A few practical constraints to know before you queue something up:
- Uploaded images must be JPG, PNG, or WEBP, up to 20 MB each.
- One generation runs at a time — wait for the current clip to finish before starting the next.
- Clips on Wan 2.7, Kling 3.0, Veo 3.1 Fast are usually ready within a few minutes.
- Seedance 1.5 Pro, Seedance 2.0 Pro, Seedance 2.0 Fast, Seedance 2.0 Mini run through a queue and can take up to 15 minutes. You can leave the page — generation continues in the background and the result appears in Recent.
- Your draft (prompt, settings, attached images) is autosaved, so nothing is lost if you navigate away.
Motion Transfer
Motion Transfer has its own tab on the Video page. Upload a photo of your character and a short video of a person moving — the Dreamactor M2 model makes your character perform that movement.
20 credits per second of the movement video, rounded up. The server measures the real duration from the file; the estimate on the button uses your browser's reading and normally matches. Nothing is charged if the video can't be read or fails the content check.
Requires Pro or higher — or any credit pack purchase, which unlocks it on every plan. The tab itself is open to everyone; the check happens when you press Generate.
Inputs
- Character photo: JPEG or PNG up to 4.7 MB. Movement video: MP4, MOV or WebM up to 50 MB, 1–60 seconds long. An optional text note is stored with the generation but does not steer the model.
- Before anything is charged, the photo, the note and three frames sampled from the video go through the content check.
- Generation runs while you wait — usually a few minutes, with a staged progress view. On failure or timeout the credits are refunded automatically. The result appears in the preview panel and in Recent.
Video FAQ
Video tips
Script to Storyboard
Turn any script into a professional visual storyboard in three steps: upload your script, review the AI scene breakdown, and generate frames. This guide covers the full workflow — from the first paste to exporting video-ready shots.
Quick Start
The whole flow in five moves:
Open the Script page
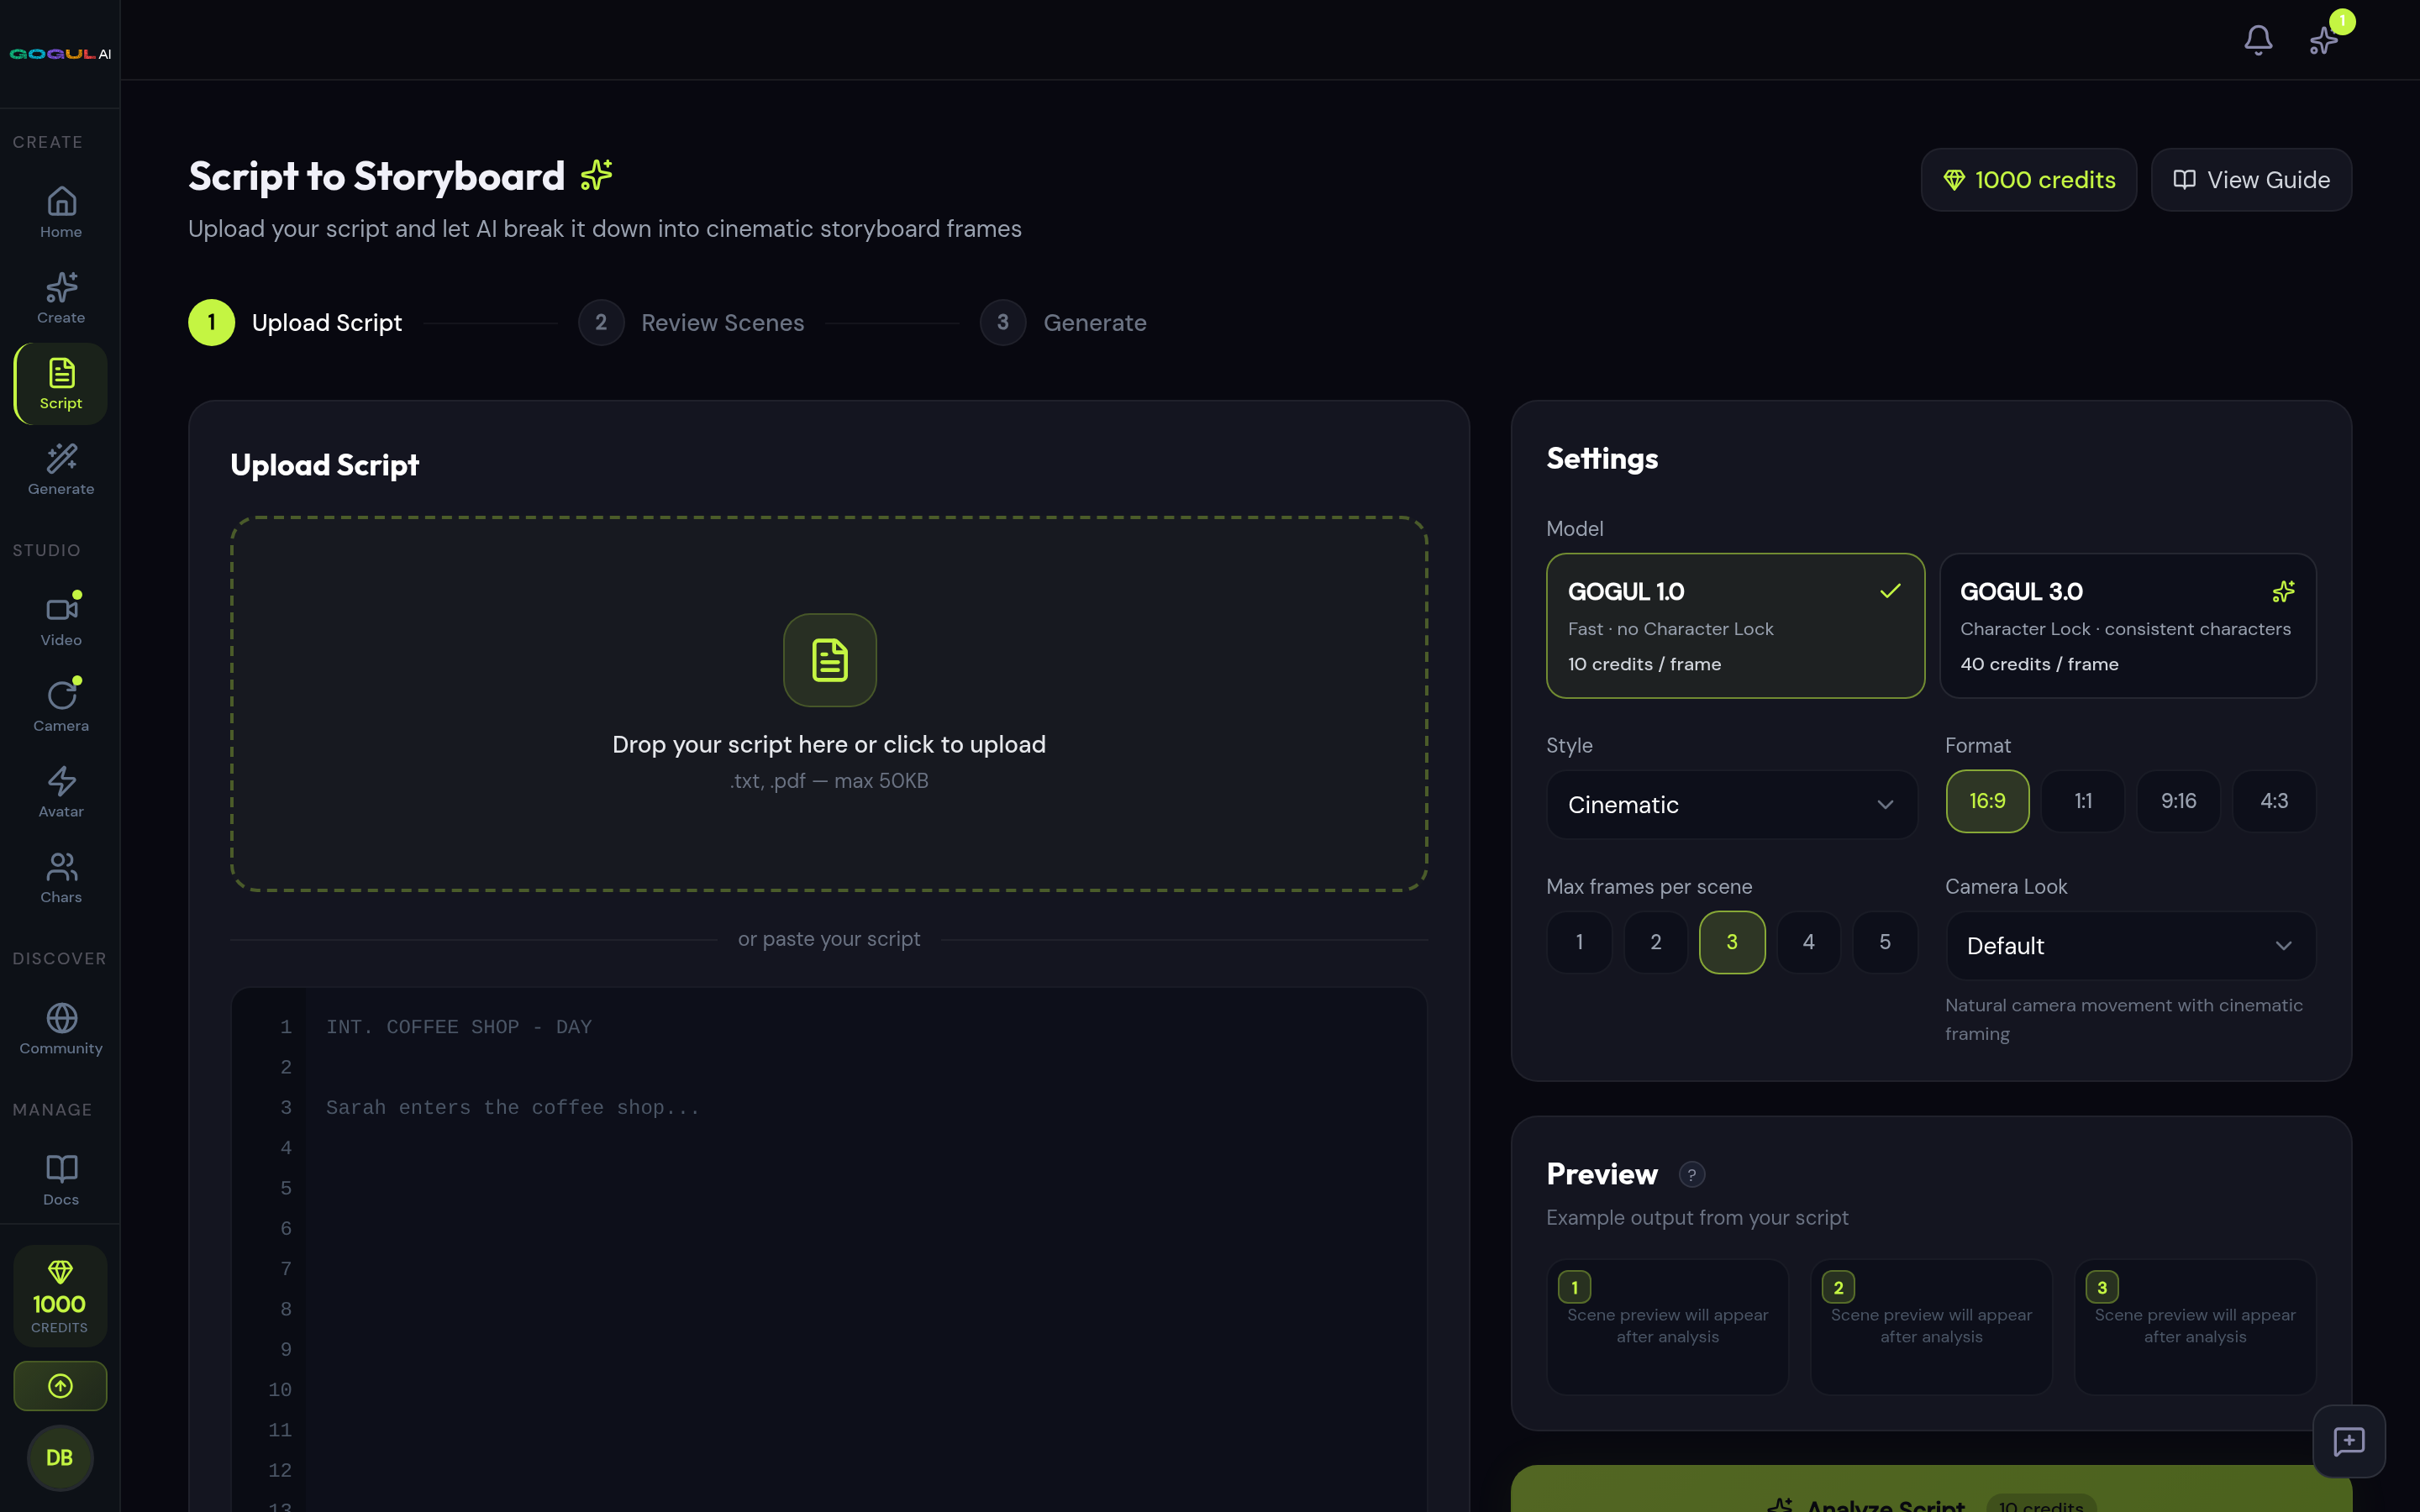
Paste your script (at least 50 characters) or upload a .txt file. No script yet? Use a Quick Start example.
Pick your settings
Choose a model (GOGUL 1.0 or GOGUL 3.0), a visual style, an aspect ratio, frames per scene, and optionally a Camera Look and characters.
Analyze Script (free)
AI breaks your script into scenes and shots — WIDE, MEDIUM, CLOSE-UP, and POV.
Review and edit the breakdown
Adjust scenes and shots, then check the credit estimate at the bottom of the page.
Generate
Watch progress scene by scene, then open your finished board with View Storyboard.
Step 1: Upload Your Script
Everything starts on the Script page. You bring the words; the settings below decide how they turn into images.
Adding your script
- Paste directly into the editor — minimum 50 characters.
- Or upload a .txt file up to 100 KB (up to 15,000 characters).
- Standard screenplay format (INT./EXT. scene headings) works best, but plain prose is fine too.
- No script handy? The Quick Start examples load a ready-made sample with one click.
Choosing a model
| Model | Per frame | Best for |
|---|---|---|
| GOGUL 1.0 | 10 | Fast drafts — Quick, affordable frames — ideal for first passes, layout checks, and iterating on scene structure. |
| GOGUL 3.0 | 40 | Character Lock — Premium quality with Character Lock: attached characters keep the same face, hair, and outfit across every frame. |
Style, format & framing
Attaching characters
- Attach up to 5 characters per storyboard.
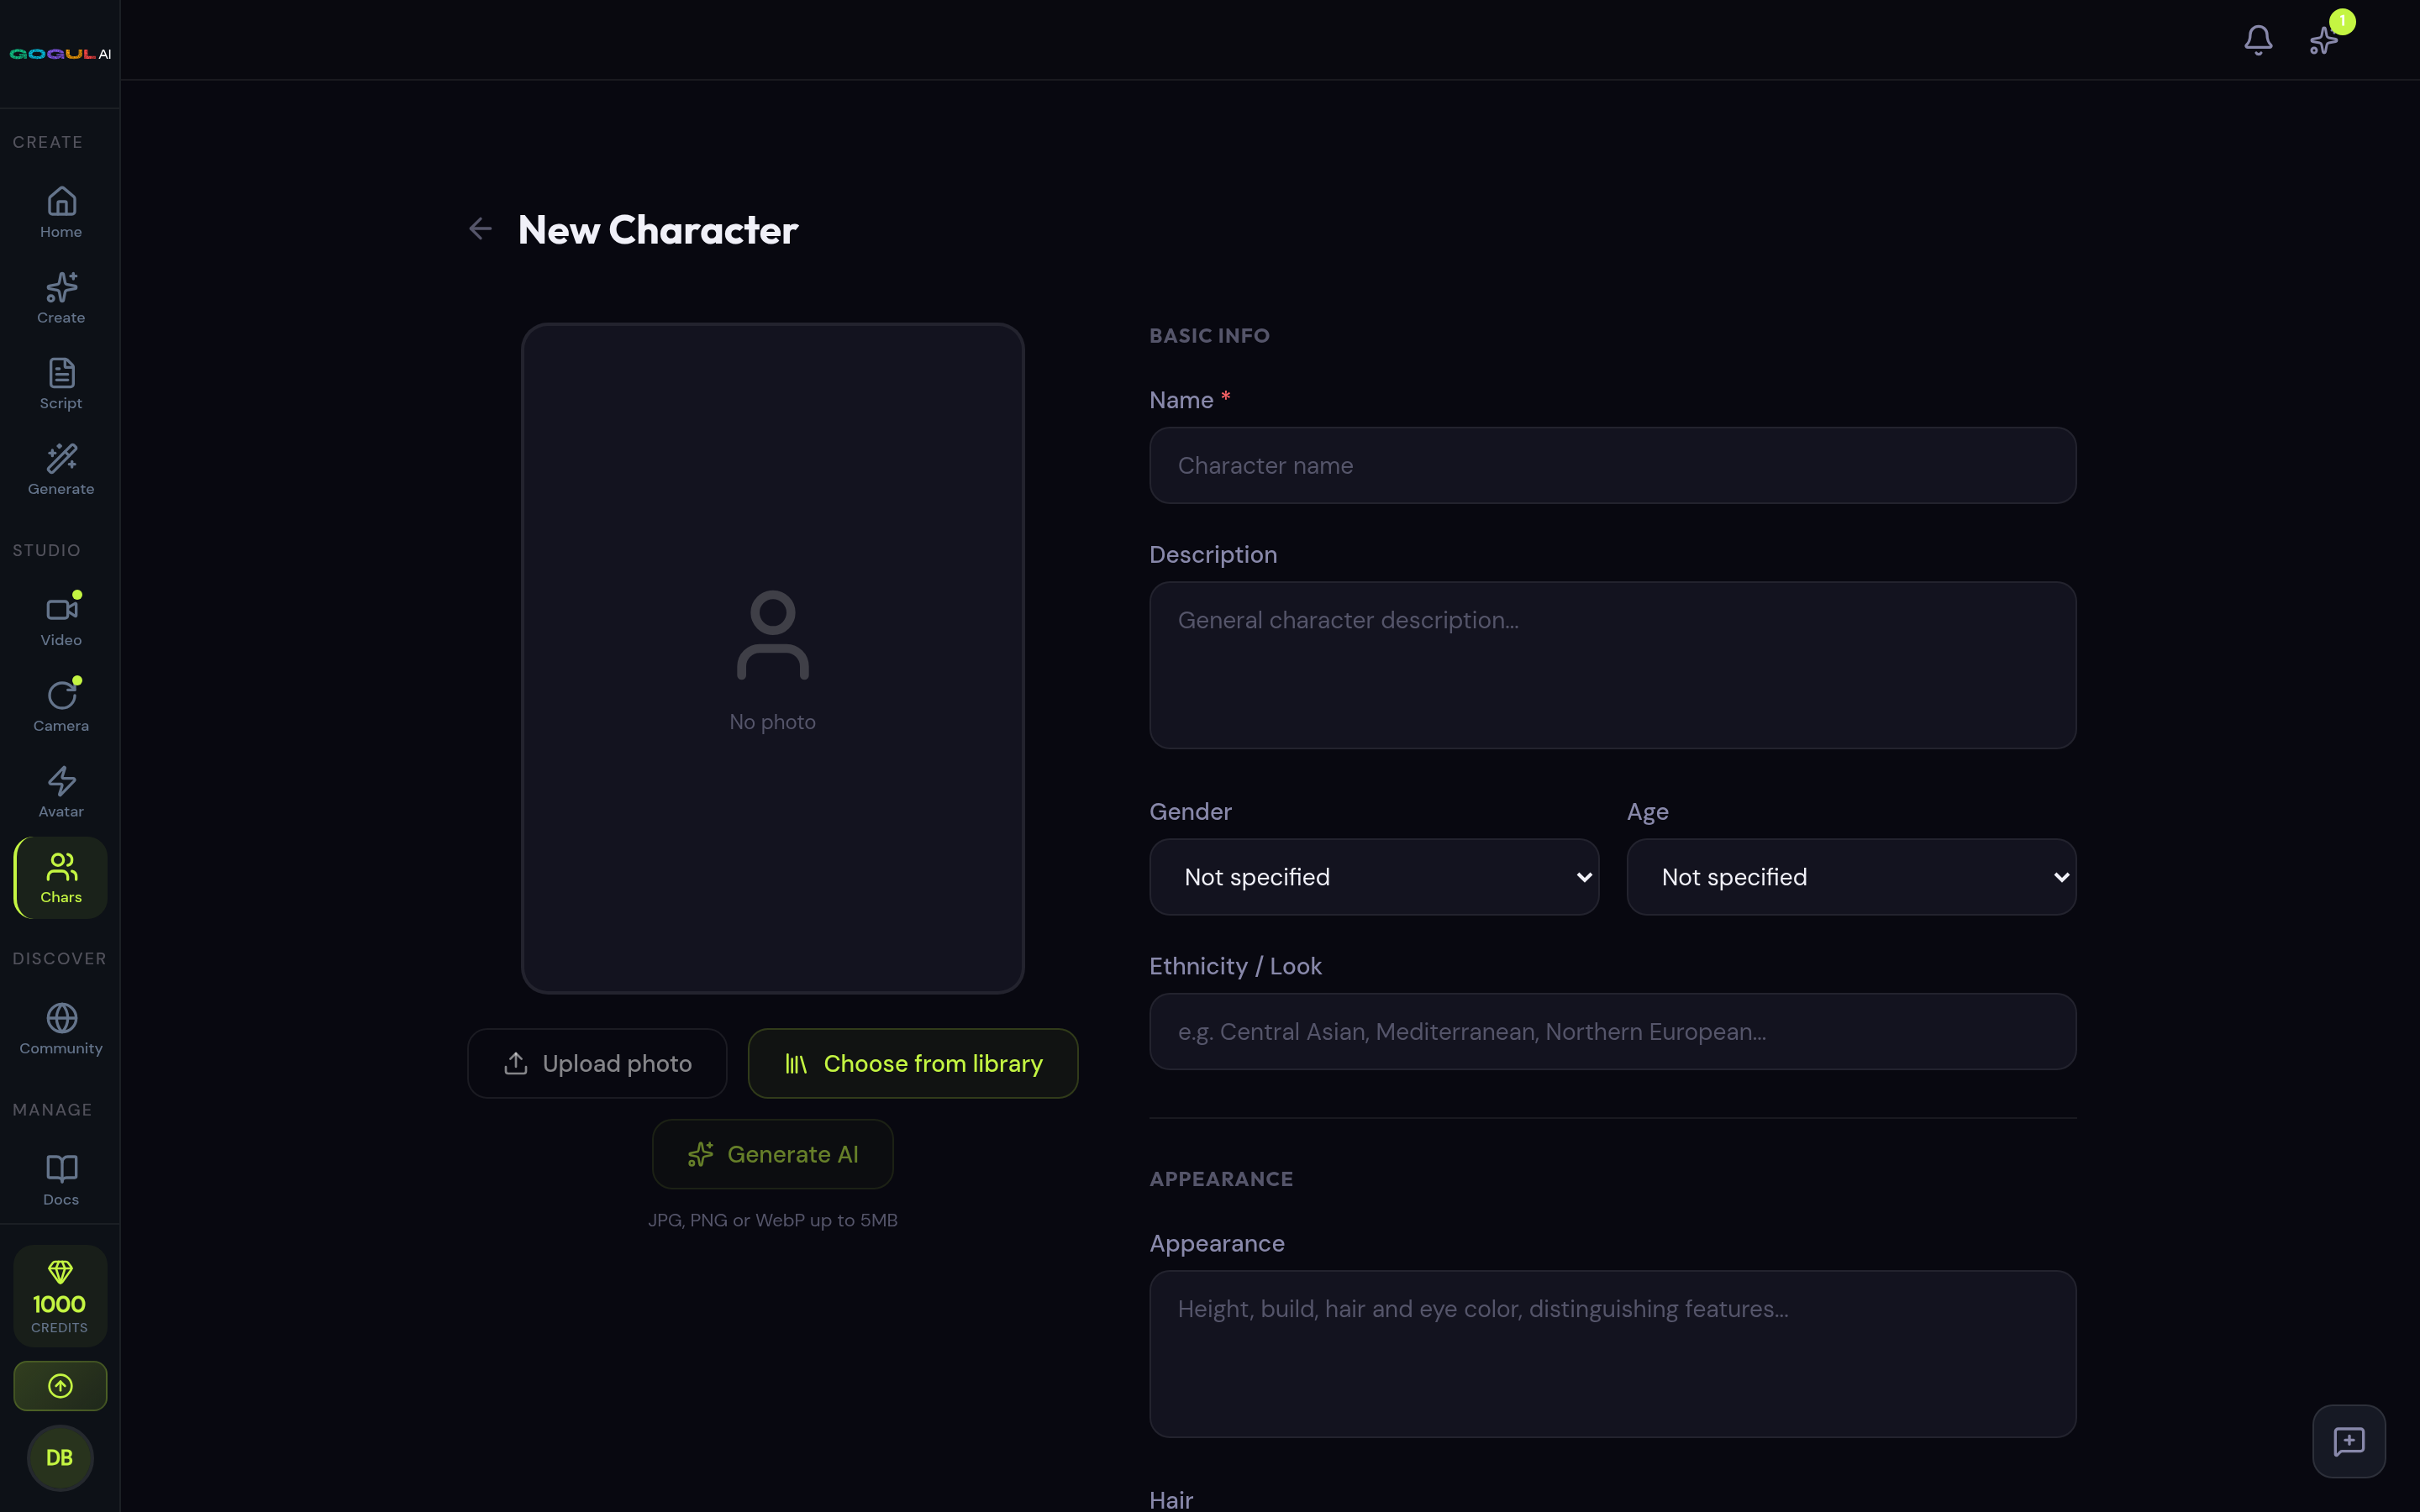
- Pick them from your Character Library, or upload a photo (up to 5 MB) right on the page.
- The AI analysis detects which characters appear in each scene and writes them into the shot descriptions. Reference photos are applied across the whole board, so each character stays consistent wherever they show up.
Analyze Script
When your script and settings are ready, hit Analyze Script — it's free. AI reads the script and splits it into scenes, each with a set of shots typed as WIDE, MEDIUM, CLOSE-UP, or POV. Nothing is generated yet — analysis only produces the editable breakdown for the next step, and you pay only for the frames you generate afterwards.
Step 2: Review & Edit Scenes
The breakdown is fully editable before you spend a single generation credit. This is the cheapest place to fix problems — change text here, not pixels later.
Step 3: Generate
Hit Generate and the platform renders your board scene by scene.
- A progress view tracks each scene as its frames are generated.
- If any individual frame fails, its credits are automatically refunded — you only pay for frames that actually render.
- When generation finishes, View Storyboard takes you straight to the editor with your full board.
Storyboard editor
Generation is the beginning, not the end. Every frame in the storyboard editor can be fixed, reframed, extended, and upscaled.
Fix a frame
Extend the story
Coverage & quality
Export
Manual storyboard
The Storyboard page (sidebar → Create → Storyboard) is a frame-by-frame canvas: frames on the left, the selected frame in the middle, its settings on the right. Write each frame's prompt yourself, or let AI Director draft the whole board from a short story.
From storyboard to video
There are two ways to put your board in motion:
Storyboard pricing
Everything in the Script to Storyboard flow is priced in credits:
| Action | Credits |
|---|---|
| Analyze script | Free |
| Frame — GOGUL 1.0 | 10 |
| Frame — GOGUL 3.0 (Character Lock) | 40 |
| Regenerate frame | 10 / 40 |
| Quick Edit | 10 |
| Change Angle / Adjust Camera | 10 |
| AI Fill Between (per frame) | 10 / 40 |
| 8-Angle Pack | 50 |
| Continue Story | 50 / 170 |
| Upscale 2K / 4K | 10 / 15 |
| PDF export (Starter+) | 30 |
Example estimate
| Action | Credits |
|---|---|
| Script analysis | Free |
| 4 scenes × 3 frames on GOGUL 1.0 (12 frames × 10) | 120 |
| Total | 120 |
Storyboard FAQ
Storyboard tips
Character library
The Characters page (sidebar → Library → Characters) stores the people who appear in your storyboards. Attach a saved character to a script and Character Lock keeps the same face, hair and outfit in every frame.
- Create a character from a photo, or save any generated image as a character
- AI analysis detects facial features, hair, clothing and body type — free
- Generate an AI portrait for 10 credits
- Generate Character Views — 4 extra angles of the same person for 40 credits, charged upfront; any angle that fails is refunded
- Reuse a character across any number of storyboards
Library size by plan
At the limit the create button opens an upgrade dialog. A credit pack does not raise this limit — it is plan-only.
Multi-Angle
Multi-Angle (sidebar → Tools → Multi-Angle) generates several camera angles from a single image and returns them as a collage. Any cell of the collage can then be rendered as a full HD frame.
Available from the Starter plan. A collage costs 20 credits; each HD frame rendered from a cell costs 20. Both prices are shown on the page before you generate.
Two modes
- Character Turnaround — white background, the same person from different angles
- Scene Angles — the same scene from different camera positions
Preset angles
Or describe any custom angle in words.
Burned-in subtitles
The Subtitles page (sidebar → Create → Subtitles) transcribes the speech in a video and burns styled captions into it. Pick a source, a caption style and, if needed, the spoken and target languages; the price appears as soon as the video is read, and the finished MP4 lands in the result card and the History list on the same page.
How it works
Pick a source
Upload a video or choose one of your generated videos under My videos.
Choose a style
The style strip previews each caption look; static and animated styles are priced differently.
Languages and dictionary
Leave the spoken language on auto-detect or set it; pick a translation language if the captions should be in another language; add brand names to the dictionary.
Check the price
The right column shows the billed minutes, the rate and the multipliers before you press Generate.
Render and download
Rendering takes a few minutes and runs while you wait. Download from the result card or later from History.
Sources and limits
Accepted: MP4, MOV, WebM, M4V and GIF, up to 60 MB and 10 minutes. Generated videos become available here once they are stored in your library. The server re-measures the file, so the final price is based on the real duration and resolution.
Have captions already? Paste an SRT file instead of transcribing: the captions are burned in as given, and the dictionary is ignored.
Pricing
Billed per started minute of video (a shorter clip counts as one minute):
- Static caption style — 34 credits per minute
- Animated caption style — ×2 the static rate
- Video above 1080p — ×2
- Translation into another language — +67 credits per minute
21 static and 9 animated styles to choose from; animated ones bill at ×2.
Fine-tuning (font, colors, position, shadow) applies to static styles only.
Source video up to 10 minutes and 60 MB. No plan gate — every plan can use Subtitles.
Avatar (Live)
Avatar (sidebar → Create → Avatar; the page is titled Avatar Studio) turns a portrait photo and an audio track into a talking-head video: lip-sync, head movement and expression follow the audio. Options: a short direction note, 720p or 1080p output, and a fast mode.
25 credits per second of audio, with a minimum of 150 credits per generation. The duration is read from the audio file in your browser, and the price is shown under the settings before you press Generate.
Requires Pro or higher. A credit pack does not unlock it — the gate is plan-only, checked on the server when you press Generate.
Community
Community (sidebar → Inspiration → Community) is a public feed of images and videos made in GOGUL. Browsing, publishing, liking and remixing are free on every plan.
Plans & limits
Plans renew monthly credits and set the limits below. The Free plan is a one-time balance.
| Plan | Credits | Price | Frames / storyboard | Characters | Video models | Exports |
|---|---|---|---|---|---|---|
| Free | 100 | Free | 8 (12 with a credit pack) | 1 | 1 | ZIP: No · HD ZIP: No · PDF: No |
| Starter | 1,000 | $9/mo$7/mo billed yearly ($86) | 12 | 5 | 5 | ZIP: Yes · HD ZIP: No · PDF: Yes |
| Pro | 3,500 | $29/mo$23/mo billed yearly ($278) | 20 | 20 | 6 | ZIP: Yes · HD ZIP: Yes · PDF: Yes |
| Studio | 9,000 | $59/mo$47/mo billed yearly ($566) | 999 | 999 | 7 | ZIP: Yes · HD ZIP: Yes · PDF: Yes |
| Agency | 30,000 | $169/mo$135/mo billed yearly ($1620) | 999 | 999 | 7 | ZIP: Yes · HD ZIP: Yes · PDF: Yes |
- Monthly subscription credits do not roll over. Purchased credits never expire while your account is active.
- Upgrade or cancel any time on the Billing page — you keep access until the end of the paid period.
- Card payments through Stripe; Click and Payme are available as local payment methods — see Payment methods below.
Credit costs
What each action costs. Video and subtitle prices are formula-based — see their sections.
| Action | Credits |
|---|---|
| Storyboard frame — GOGUL 1.0 | 10 |
| Storyboard frame — GOGUL 3.0 (Character Lock) | 40 |
| Regenerate frame | 10 |
| Continue Story (plus frames at the model rate) | 10 |
| Change Angle on a frame | 10 |
| Adjust Camera (one angle) | 10 |
| All-angles pack | 50 |
| Edit image (1K) | 10 |
| Edit image (2K) | 20 |
| Brush / inpaint | 15 |
| Outpaint | 12 |
| Relight | 12 |
| Remove background | 5 |
| Upscale 2K | 10 |
| Upscale 4K | 15 |
| AI character portrait | 10 |
| Character Views (4 angles) | 40 |
| Multi-Angle collage | 20 |
| Multi-Angle HD frame | 20 |
| HD PDF export | 30 |
| Subtitles, per minute (static style) | 34 |
Credit packs
Need more credits? Buy a pack any time, on any plan.
- Purchased credits never expire while your account is active.
- Any pack purchase also unlocks plan-gated models and quality tiers (except plan-exclusive video models) and lifts the storyboard frame ceiling to 12 frames.
Payment methods
Card payments run through Stripe: subscriptions renew monthly or yearly, credit packs are one-time. Two local methods appear on the Billing page for Uzbekistan — detected by location, profile country or the Uzbek interface language — and are priced in so'm:
- Click — credit packs only. Press Pay via Click on a pack card, finish on Click's page, and the credits arrive once Click confirms the payment.
- Payme — subscriptions only. Press Subscribe via Payme on a plan card. The plan is activated for a month after payment; there is no automatic renewal, so pay again to extend.
Referral rewards are granted for card subscriptions only.
Referrals
Share your link from the Referrals page (sidebar → Account → Referrals). Your code is attached when a friend opens the link and registers.
When the friend pays for a subscription by card, you receive 200 credits and they receive 200. Nothing is awarded at signup, and credit-pack or local-method payments do not count.
Referrer rewards stop at 5,000 credits in total (25 paid referrals); the friend's bonus is always paid.
Self-referrals and referrals from the same IP address or the same email are blocked. Rewards are reversed if the subscription is cancelled or refunded.
Milestone bonuses
How it works
Copy your link
The Referrals page shows your personal link and share buttons.
A friend signs up
The referral is recorded as pending when they register through your link.
They subscribe
The first card payment for a plan turns the referral into a reward for both of you, and the page updates its stats.
Settings & security
Settings (sidebar → Account → Settings) has four blocks: profile, subscription, security and data.
- Profile: display name, avatar and interface language. The email address cannot be changed here.
- Change password: enter the current password, then the new one twice.
- Two-factor authentication with an authenticator app (TOTP): scan the QR code or type the key, then confirm with a code. There are no backup codes, so keep the authenticator safe. Disable it from the same block.
- Export your data downloads a JSON file with your profile summary and all storyboards with their frames. Generated images, characters and videos are not included — download them from their own pages.
- Delete account is immediate and irreversible: type DELETE to confirm. Files, storyboards, generations, community posts and comments are removed, and a Stripe subscription is cancelled without a refund for the remaining period. A short anonymized payment record is kept where payment providers require it.
Upload limits
Limits enforced by the product configuration:
- Video prompt — up to 7,000 characters
- Reference images per generation — up to 14, depending on the model
- Subtitle source video — up to 60 MB and 10 minutes
Per-page upload sizes (character photos, storyboard references, Multi-Angle input) are shown next to each upload button.
Contact support
- Email: [email protected]
- Response time: within one business day
- For generation issues, include the storyboard name and the frame number.